Today’s guest tutorial comes to you courtesy of X.
Page curls can bring a little flair to many sorts of applications. They seem to be a particularly popular effect in e-books, helping to evoke some of the feeling of a physical book.
There have already been some Corona implementations, using masks for instance. A couple examples are found here and here.
The recent availability of custom shaders has made further refinements possible. I implemented a few of them, and this article explores how I went about it.
Background material
My effect relies extensively on two-dimensional geometry, (circles) and (vectors) in particular, and a few sections will inevitably reflect that. If you find the need to familiarize yourself with this background material, please refer to my previous articles. (TODO: links)
Some preliminary analysis
This began life in a (forum thread) posted by Tom Greger Knutsen, AKA sirmania (TODO: info). At the time I was knee-deep in some rather out-there effects, so I was busy on the one hand but ready for something down-to-earth on the other. While it sounded interesting, it looked like it would need to wait. If there were no takers in the meantime, I could dive into it once other matters were squared away. In any event, this would give the ideas a chance to work themselves out a bit. (TODO: link, expand, etc.)
Tom posted a couple videos showing (what he was after), which demonstrated the effect as found in certain GUI suites. I took a look and began to puzzle out what must be going on. (TODO: link)
The whole idea, of course, is that the curl should bear at least some resemblance to a physical page, being turned by a finger or two. We generally do this without putting much thought into it; the experience tends to be consistent. Uncurled paper is (almost) indistinguishable from a rigid image, mutatis mutandis, so the effect probably would work best having this as its reference state.
With these thoughts in mind, the first order of business was to grab a sheet of paper and start rolling the edges around with my finger. As scientific discovery goes, this rather pales next to Tesla with (megavolts of raw power) splashing all around him, but all the same it helped to clarify some details. (TODO: images)
The curling part of the sheet looks a lot like a cylinder, especially when you start from a corner and continue diagonally. Once you veer off this line, one end or the other starts to taper, so we have something like a stunted cone. The math is a little simpler in the former case, so I decided to give it a try. In the end, cylinders appear to work just fine.
I figured shaders would let me best attend to a lot of the fine detail, so some of the structural details were also important. Seen in profile, a cylinder (or a cone, for that matter) has a circular cross-section. Approached at an angle, however, this becomes an ellipse, whose arc length is difficult to measure—which is unfortunate, since we do a lot of this! The page could be curling all over the place, so I was worried I would indeed have to handle this more general shape. Thankfully, my luck held out, as I began with the easier circle case and it turned out well.
Lastly, at the scale of a page in a book, paper tends to be rigid enough that, after traversing a half-cylinder or -cone, it remains fairly flat, or close enough at a glance. Working under this assumption, I was able to restrict page behavior to a manageable four possible scenarios: uncurled, lower curl, upper curl, and leveling out.
Synopsis
After asking a few questions in the forum to see if anyone had any strong opinions about how the interface should look, I camped out for a few weeks. My thinking was that, if I were the one who took this on, I would begin with the touch controls, to "get them out of the way".
Anyhow, a few weeks went by. As expected, I had some good meditations on the ideas. my earlier commitments, while not quite complete, were at least well along. As is the way of things, I dipped my toes into the water a bit for a couple days. Then I dove in. A night or two and I had the effect approximately working.
Now, this is not to say it was beautifully crafted. This was one specific case and split up across several display objects. But the curling behavior was there, and probably shadows and such as well.
To my great surpise, Julian Stokoe AKA kilopop (TODO: info) took what I posted and ran with it, building some (screen transition effects) from it. He already had some ideas with it, which I answered by pointing out how and where to edit the code. Suffice it to say, this was exactly the same sort of material I was fishing for with my initial informal survey, so I started pondering how, as I progressed, to better structure the curl to accommodate such possibilities, as well as others that would emerge.
His particular needs, arising from needing to capture the screen, meant that a lot of video RAM was being consumed, on account of my design using several display objects to supply the components of the effect. This is a (viable approach), but this particular use case entails full-screen behavior and thus necessarily lots of pixels, which in turn translate to lots of RAM. I noted him asking around about this point and figured, if I was already seeing this need so early, better to nip it in the bud. Thus, I revisited the shader implementation and streamlined it to accommodate each of the curl situations. (TODO: link to Corona Geek episode)
When I first reviewed the videos Tom provided, it stood out to me that the back of the flipped page simply used the front texture. Books, of course, usually populate that side with a fresh page of text, so I had at least this in mind. Among Julian's inquiries was that of leaving the back of the page blank, as well as only tinting that side. These two considerations more or less dovetailed, and helped beat the shader into the proper shape.
Thus a fairly general structure followed. The page image could be duplicated on both sides, different on each, blank on one, or even blank on both—as is fairly common in the front matter of books. Captures were still sort of the odd man out, so I simply allowed an "external object" approach to include objects instantiated outside the page effect.
Meanwhile, I was trying to work out a decent interface. In doing so, I was deliberating the introduction of various page constructors beyond those just mentioned, mostly mirroring Corona's display object APIs: images, of course, but also rects, perhaps circles, sprites, and so on.
Apart from the redundancy of the whole thing, the problem was that my abstractions ran up against some real-life needs of Corona. Sprites in particular flushed these out: any given frame uses only part of a texture, but some other considerations, described below, mean I had to expand the texture coordinates, which in turn means I would need a nice unit rectangle in which to operate. Goodbye sprites!
This was an ugly corner case, but there was no real getting around it, leading me to scuttle this approach. As I thought about it more, it became obvious that I could simply allow snapshots, and then the user could populate it with all those same objects. They could even apply their own effects to said objects, which was another limitation that was becoming clear to me. And so it was decided.
Well, nearly everything needed to integrate snapshots was enough to bring in captures, too. Thus, the hackish "external object" approach was abandoned and I just brought in captures wholesale.
In the process of doing all this, the API more or less suggested itself. It seemed increasingly clear that I ought to brand this as a sort of widget, since it would typically be an interface element. That said, nothing holds it back from being used more broadly.
All the while I put off touch. From having watched the videos I was not quite sure what was going on. My initial suspicions were that it was necessary to track one's current position and work from there. As I began, I almost despaired, realizing how onerous that would be!
Sooner or later I found that it was simpler, and thought things would move along quickly. I was wrong! Much time was spent puzzling out the math, with untold numbers of near-solutions that quickly diverged from your touch. Eventually, however, I had breakthroughs. Though in many cases I would have what appeared to be a perfect solution to one case only to find it seemed to violate the other, making me doubt the former. These more or less resolved in the end, but it was frustrating in the meantime.
Once I had that more or less in place, I revisited the shader. Up to then it was rather broken up to account for each possibility. But I went ahead and streamlined it, and made it so that each case was generated on demand. A little more information will be provided on this, further down.
Following a few more fixes, I was all ready to bring up my newest results when I noticed Tom's original need to deal with two directions. Whoops! Thankfully, I had at least wondered about this and generalized the touch code enough to handle the left and right sides on their own. It was only a little more work to allow two sides at once (and would only be a little more to open three or all four).
After a little stress-testing, it was off to the store!
The effect
Enough with the history, on to the effect!
When left alone, a page looks like any other texture, as pointed out earlier, so we take this as our point of departure.
Once we begin curling, the edge of the page gradually assumes cylindrical form. Any cylinder must roll around something, namely its axis, so it follows that something like this must exist. This being a circular cylinder, a parallel strip would run along the surface, just where it was "taking off". At the same time, there is a very definite sense of "forward".
I decided to start with the latter. No obvious alternatives came to mind as far as being able to control the effect programmatically. It would be incumbent on the user to either know some geometry or be able to follow a few guidelines, but that comes with the territory.
Since this is essentially a pure texture effect, it makes sense to work in texture space: $ [0, 1] \times [0, 1] $. As a bonus, this renders irrelevant most concerns about dimensions.
The forward direction will be given by an angle. Both degrees and radians are provided—one simply builds on the other. Accepting this as an angle is meant as a convenience to the user: one angle might be enough, or a transition will vary over a narrow enough range, that providing a (normalized) vector would be a hassle.
The forward edge has a location, of course. Given the forward direction, we can use (point-normal form), meaning we just need a point—any will do—along this edge to specify the whole. These points are specified in the aforementioned texture space.
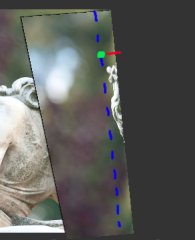
The image on the right shows how this all transpires. The dashed blue line simultaneously represents the axis as well as the parallel edge where the curl begins, obscured in this case by the back page overlapping it. The green dot marks a point along that same edge, again underneath. The short red line emanating from this point is the direction along which the effect travels. As this shows, it only goes a very short distance before rolling around and coming back the other way.
The foregoing assumes a straight-down view of the page, rather than looking at it aslant. I am not aware of an implementation that does otherwise. This enables a fairly intuitive geometric approach.
Various graphical options
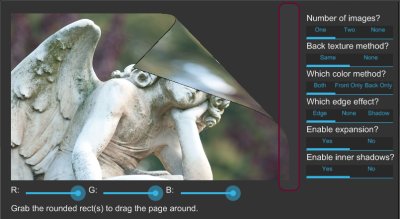
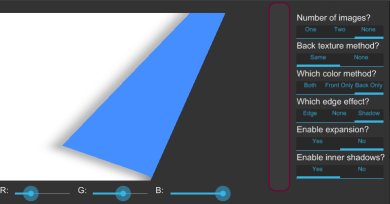
The above image, taken from from the plugin's sample application, shows the various available options, along with a partially curled page.
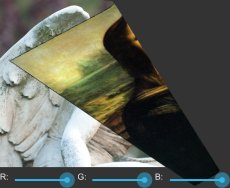
Going down the right-hand sidebar, we begin with the number of images. A page has a front and back. The one-image case comes first: here, the same image is used on both sides, as shown above. Two images means a separate image is used per side, as seen further up. No images, meanwhile, leaves both sides blank.
Next up is the back texture method. This is only relevant in the one-image case. By default, we get the aforementioned both-sides behavior. But if desired, the back of the page can be left blank.
Continuing, we come to the color method. This is where those color sliders in the bottom-left come into play. In "both" mode, the front and back are tinted by this color. "Front" and "back" modes, meanwhile, will tint only their respective sides. This is seen further up, where a blank surface with back-only behavior is tinted a light blue. A color of white, the default, is effectively "no tint".
The edge effect is some behavior applied around the back edges of the page. In the above image, the basic behavior, simply styled "edge", is in use: a black tint along the edge to make it stand out against the background. "None" will forgo any special behavior, which might be undesirable if both sides are fairly similar-looking. Lastly we have "shadow", as seen in the blue-tinted image above, where a soft shadow is visible around the edges.
The edge behaviors by no means exhaust the possibilities (indeed, I probably should have included some of my interesting "mistakes"), and are grouped together mainly because of their similar implementation, but offer at least a couple decent options. Perhaps some redesign will come down the road, though obviously it would be best not to break the API where possible.
Because these all occur "on top", they might admit of being implemented with separate display objects, which would simplify the shader a bit and remove a per-pixel operation that is only being applied to a relatively small part of the visual surface. Positioning these proxy objects seems feasible using the mechanisms built for touch controls, which will be explained shortly. This also suggests adding features such as specular highlights.
Expansion, elaborated upon below, determines whether the surface should be clipped. An instance of this can be seen in the blue-tinted image, along the top and bottom, as contrasted with the dual-sided image, which spills off the "base" rectangle. Generally you will leave this alone.
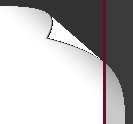
Finally, we have inner shadows, which may be disabled. These are fairly subtle, but can be seen in the slightly curled white page at the outset of the article. The effect is meant to exhibit some of the self-shadowing that occurs in the lower curl as the cylindrical shape takes hold.
Thinking local
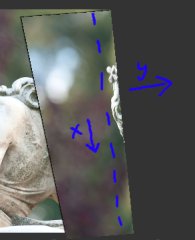
At a high level, the basic idea is, at every step along the edge (the dotted line in the right-hand image, though "below" the curled-over part), following the "x-axis", to march forward along the "y-axis". These axes are part of a local coordinate system, of course. We march until we hit the edge of the page. This might involve walking along the cylinder, of course, so the edge could be behind where we started.
That is actually too simple of an explanation, however, even if it already sounds anything but!
The lion's share of this process will take place in a shader. These adhere to a different paradigm than the top-down one we might use to write this in Lua, iterating down the axis one step at a time and doing a secondary traversal along the forward direction at each of those. Rather, each pixel is like a drop in a visual ocean, passively awaiting orders. None of these pixels know much about their neighbors, beyond any context given to them before drawing begins.
This allows massive optimization: by cordoning the pixels off from one another, the GPU can go wild and execute huge batches of pixels more or less simultaneously, without worrying about them stepping on one another's toes, as it were.
Often this also mean a pixel must do some work to get its bearings. This is so in the page curl effect. Every pixel must figure out for itself its place in the grand scheme of things.
Winding up...
As stated earlier, when and where nothing is happening, the page is flat, essentially a normal image. This means axis the edge point is on one of the sides of the rectangle, so the edge is flush with it as well. This is the "uncurled" state.
When the point is within the interior, however, the page begins curling immediately from the axis in the forward direction. The underlying cylinder has a reasonable radius, hereafter $R$, and the curl will begin by tracing a quarter turn around it. This is the "lower curl" state.
(NOTES: Ugh, this is an utter dog to write :P )
We proceed forward, walking over pixels, until we exceed the radius. Once curling is in effect, some of this length gets spent, as it were, wrapping around the cylinder. Such pixels can be rejected. At that point, we know the cylinder will turn back again, so we can stop this phase. Of course, when the edge is close enough to the edge of the rectangle, the edge of the cylinder might not be reached. For that matter, when slanted, the length will vary all along the axis.
Now, as the last section pointed out, we are coming at this the other way around. The curtain lifts on us, and we find ourselves in the middle of a play already going on. We need to figure it if we even belong here.
The shader is given a bit of context to work from: the edge point and normal, hereafter $ \mathbf{x} $ and $ \mathbf{n} $, respectively. $ \mathbf{n} $ is the "forward direction", evaluated from the angle passed in earlier, and a unit vector.
In traversing up to the radius, we have basically been talking about the pixel's $y$ coordinate, locally speaking.
Getting its component in the y-axis is fairly simple: $ \dotvwparen{n}{x - p} = n_y. $
Since $ \mathbf{n} $ is normalized, this is in the same units as the radius. Since the curl is going forward, then, we know our pixel is still legal if $ 0 \le y \le R $. If not, we just emit a clear pixel and quit. Otherwise, we might be on the lower curl. (This "might" is important.)
We might also run out of texture before we walk the whole half radius, though! Because the axis can be oriented rather arbitrarily, we might only be curling a small corner, though logically this is wrapped around a larger cylinder. This is basically a bounds check on the texture coordinate: are either of them less than zero or greater than one? This logic is streamlined a bit to account for any stage of the effect.
As far as the pixel itself, we run into a big gotcha. If we try to sample the texture naively, as if the point were simply the linear distance away from the edge, the texture will get all scrunched at the curl. This is because such a strategy fails to take into account how some of the length is diverted into the roll.
What we need to do is leave off linear distance at the edge and use the arc length of the cylinder's cross section circle.
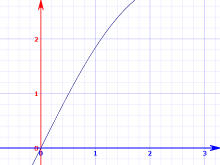
The y-axis being forward, the circle looks like the image, so this length is $ R\sin\theta $. We can rearrange this as $ \sin\theta = {n_y \over R}. $ [image]
Arc length requires the angle, so we solve for it: $ \theta = \sin^{-1}{n_y \over R}. $
The final length, then, will be $ R\theta $. This is how far we must walk alonge $ \mathbf{n} $ from the edge point. Then we go "left" or "right", parallel to the edge, by $n_x$ to land at the appropriate texture coordinate.
...coming back around...
Since the two quarters of the half-cylinder are stacked vertically, the upper curl is basically the same situation, with respect to where it is along the y-axis. Thus the "might" earlier, pertaining to the lower curl. If we had enough arc length to get here, this is an upper curl pixel, otherwise lower.
For that reason, this case should actually be handled first. Unlike lower down, if we run out of texture, we might still be able to draw the pixel below us. The shader is structured with this in mind. This is also why the shadow edge effect works.
The angle, while not the same, will be symmetric. We can find it by subtracting $\theta$ from $\pi$, then get the final arc length from the result. As with the lower curl, we use this amount to walk forward along the texture. Note that texture space is flat: we need not account for the curl there as we do with the effect proper.
...and leveling out
After traversing the half-cylinder, we are suddenly behind the edge, so $n_y$ goes negative.
At this point, we enter the final stage, where the page levels out again. We can thus resume using a linear distance, which will be $ -n_y $. Having already traversed the semicircle, however, we must incorporate that distance as well. In total, we then have $ \pi R - n_y $.
You're out of bounds!
Except when curled either perfectly horizontally or vertically, the page will spill outside the bounds of the underlying display object. If nothing is done, it will just get clipped when it does this. (And this is provided as an option, since it might even make sense if the widget is full-screen or seen through a window or frame.)
I gave some thought to trying to track which direction the page was being curled and use one or two extra objects there, each with the page curl effect and some knowledge of where they are. For instance, if the page slightly overflowed the top and left sides, use the original object for the bulk of the page, then a couple more placed over those other regions.
However, the effect is meant to be used on snapshots and captures too. The way paints work right now, these cannot be passed as inputs, so the multi-object approach falls apart. Either we need to hobble snapshots and captures, or find a separate approach.
It turns out that an approach that works for snapshots and captures can also be applied to normal images, so it gets used across the board. Basically, the underlying object is made twice as large. In the shader, the texture coordinate ranges are remapped from $ [0, 1] $ to $ [{-.5}, 1.5] $.
This ends up putting the texture where it was before, but surrounded by emptiness, some of which might be occasionally occupied by a curled page leaf. The outside-the-page logic mentioned earlier will usually emit clear pixels.
Touch controls
The curl effect would be useful to only a few users if everything had to be done programmatically. The impetus behind the whole undertaking, after all, has been to simulate leafing through a book, a rather tactile affair. Touch controls are vital.
The essentials are not terribly exciting or innovative: a basic grabbable region, managing the touch focus, a bit of filtering. These are the nuts and bolts of your average Corona application.
I did end up providing a little bit of cushion in this region, as it felt very unnatural to grab slightly outside the border-sized region and have your touch fall flat. These were clamped, of course, as were slightly off touches in the other direction.
Drags outside the rect are a bit of an ongoing issue. In a physical book, doing even a bit of this sort of thing would soon leave your page in tatters, but of course a general-purpose plugin needs to be a bit more forgiving. Clamping is again an option, though it can be a bit jarring.
Some special clamping is needed right along the edge of the page itself, right around where it can be grabbed. Dragging vertically here results in abrupt and unpredictable rolls of the page. My current solution has been to use a Type II Chebyshev filter. This gives a scale factor that stays very close to one up until just shy of the grab point, then drops like a stone toward zero. It then starts to ripple, but we no longer need it. This allows for a continuous but sharp approach.
Now, the effect itself came about pretty quickly, so I figured making the curl track the touch would not be so bad. I was wrong! This was an utter beast, with one almost- solution-but-ultimate-failure stab after another. In the meantime, the touch and curl would gradually drift away from one another, abruptly jump, and so on. Even as I worked out the stages, they never all fell in place at once.
Anyhow, I did finally win through. All along I was on the track, merely getting snagged on one error or another. Whereas a pixel could quickly surmise its whereabouts and then figure out where it came from, the touch knows how far from the edge it is and needs to say what length away the edge point must have from the edge. This is subtly but powerfully more difficult. Thankfully the normal is not so bad.
Back to the wind-up, now with touch
As before, we first look at the lower quarter circle, when the page is just peeling away from the edge.
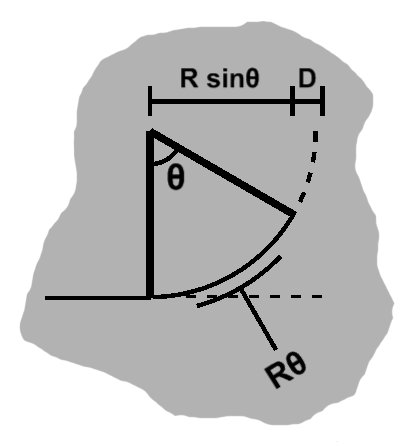
In this and the following sections, $D$ refers to the distance, starting from the side, that we must walk backward along $ \mathbf{n} $ to corresponding to arrive at our touch. This is almost, but not quite, equal to the distance to the edge.
Between the point where it begins curling and the edge, we have some horizontal arc distance plus $D$. The way we unfurl the page (see the picture), we traverse a circle counter-clockwise, with 0° at the bottom and 90° going right. So the horizontal distance will be $ R\sin\theta $, for a total distance of $ R\sin\theta + D $.
Now, as this is peeling away, the distance should be the arc length, which we know to be $ R\theta $.
Putting these together, we have $ R\sin\theta + D = R\theta $, which we can rearrange as $ {D \over R} = \theta - \sin\theta. $
Solving the angle numerically
The terms on the right-hand side tickled my brain, and after a little investigation I found it shows up in the formulation of a cycloid. I wasted a little time trying to exploit this, but it seemed to be a dead end. What I did find, doing this, was that no proper analytic solution is available for finding $ \theta. $
Now, $\theta$ can range from 0 to $ \pi \over 2 $, the latter being a little less than 1.6. If we look at $ \theta - \sin\theta $ up close, it ends up being fairly smooth.

We can find this via numerical techniques. What I ended up doing was a binary search. Start from the middle, see how close the result is, when not too different, use the input, otherwise go left or right, do the same thing, etc.
This seemed to work well enough for me, but techniques such as Newton's method are also available.
Anyhow, once we find a $\theta$, we immediately find the arc length as $ R\theta $, which is what we need.
Touch and leveling out
Now, before we deal with the upper half, we should skip ahead and see the page as it starts to level out.

A half-circle will already have been traversed, so a length of at least $ \pi R $ will already have been drawn up, putting us that far over at minimum. As we drag further over, there will be some extra cushion, denoted above as $B$.
The half-circle will by definition have the radius $R$ as its width. As we drag further, we also have some cushion above, namely the leveled-out part, denoted by $x$.
All those distances are side by side, so we can add them up to get $D$: $ A + B + \pi R + R $.
The bottom length, of course, is everything but $A$: $ B + \pi R + R $.
As in the lower curl case, the bottom sum is the same as the arc length: $ x + \pi R $.
Equating the last two, we have: $ B + \pi R + R = A + \pi R, $ which reduces to $ A = B + R. $
By substituting this into the first equation, we have $ D = A + A + \pi R, $ which is $ D - \pi R = 2A, $ and $ A = {D - \pi R \over 2}. $
We want the arc length, of course, so we plug this back into the third equation and finally get $ D + \pi R \over 2 $.
Curling back around with touch
Back to the upper curl. We now know our bounds.

As we mentioned in the level-out case, that will begin once an arc length of $ \pi R $ has been rolled up, and thus it also forms the left boundary.
The lower part will traverse $ \pi R \over 2 $, but the arc will also be complete and poking out by $R$, so we need to deduct that, too, giving us a right boundary of $ {\pi R \over 2} - R $.
So we have an interior range of $ \pi R - \left({\pi R \over 2} - R \right) = {\pi R \over 2} + R $ to work with. The bottom quarter circle is already done, meaning $R$ has been used up, but we have some cushion $A$ and $B$ on the sides, so these sum to $ \pi R \over 2 $.
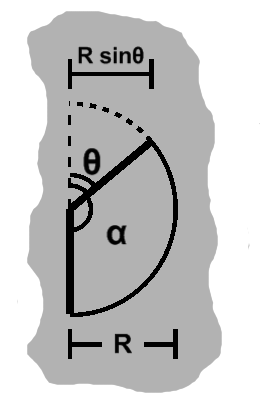
The arc length will be $ R\alpha $, of course. The change in variable name will be covered shortly.
As before, this length is equivalent to the sum of the bottom parts except $A$. If we include $A$ as well, we get $ \pi R $. Keep this in mind, too.
The distance $D$ will be $ {\pi R \over 2} - R + B $, plus the horizontal distance traversed by the upper curl.
This is worth a closer look.
So, $\alpha$ is the angle relevant to the arc length, but "the rest" of the arc falls under $\theta$. So $ \alpha = \pi - \theta $.
We can see the horizontal length of the arc will be $ R - R\sin\theta $, and we can find $D$.
As mentioned, we can subtract $A$ from $ \pi R $ to get the sum of those bottom terms. But $ A = {\pi R \over 2} - B $, so this is $ \pi R - \left({\pi R \over 2} - B \right) = {\pi R \over 2} + B. $ That sum is also the arc length, so we have $ {\pi R \over 2} + B = R(\pi - \theta). $
Now, we know $ D = {\pi R \over 2} - R + B + R + R\sin\theta. $ We can cancel the $R$ terms, and substitute to get $ D = R(\pi - \theta) - R\sin\theta = R\pi - R(\theta + \sin\theta), $ and finally $ \pi - {D \over R} = \theta + \sin\theta. $ Once again we have a rather nice function, so $\theta$ may be found using the same search strategy used in the lower curl stage.
Finally, we plug $\theta$ back in to find $\alpha$. Multiplying this by $R$, we have our arc length.
A touching farewell
Rolling back. When a touch is released, the page will gradually unfurl through a transition. It will take into account where along the side the page was grabbed and rewind the page accordingly.
Any of the four sides can be grabbed, and even a few combinations are available. Touch can also be disabled, either temporarily or permanently, say to give way to programmed rolling. When disabled, the page will first snap back to unrolled state, unless otherwise requested.
Rather than rewriting logic for every side, the coordinates themselves are basically reinterpreted in reference to some preferred side (the right side). The curl state, once computed, is then applied to that side.
The shader
The effect supports quite a few options! Basically, this is one large ("uber")
shader with a bunch of #ifdefs around various options, which are conditionally enabled. Doing so actually creates separate shaders for each.
Shaders are passed as source to Corona's graphics.defineEffect API, as a string. To enable
these options, a fragment with the appropriate #defines is prepended to the "master" shader and the shader compiled.
Of course, we only need to compile it once, so we check if this string has been registered. Certain options are unable to interact, so some care is taken to keep their
#defines from overlapping, as this might cause unnecessary duplicate compiles even where not necessary.
Two-factor properties. We immediately update the effect in progress, but also make a backup since we want to transplant these values when switching effects.
Shader reassignment is eager, which could cause hiccups if several changes are executed in sequence that would cause new shaders to be compiled, say during startup. If this is the case, a batching API is on hand to accumulate these changes, then only register them at the end, avoiding any spurious intermediate new shaders.
Some events
It is useful to be able to do something during touch, so some grab, drag, and release events are provided.
Grab region
The grabbable parts are outside the purview of the widget, especially as far as styling goes, so these regions are invisible. However, where you can grab is not necessarily obvious, and the user might want to give some graphical indication, so these regions may be queried.
Summary
Huzzah!